No customer wants issues with their order. Any delays or problems will result in a poor customer experience and could lead to negative reviews. It’s vital to ensure fast and accurate order fulfilment, while also making it as efficient as possible.
In this article, we outline some of the lesser-known things that Sellerdeck Desktop can do to speed up your order fulfilment and reduce errors, including:
- Automate Repetitive Tasks
- Accelerate Packing Using a Picking List
- Accelerate Packing Using Barcodes
- Reduce Telephone Enquiries About Orders
- Capture Accurate Delivery Information
- Avoid Missed Delivery Dates
- One Click Order Completion in Sellerdeck Desktop
- Configuring ‘One Click’
- Advanced One Click Order Completion
- Enabling User-Selectable Shipping Dates
Automate Repetitive Tasks
Sellerdeck’s One Click Order Completion enables you to perform multiple tasks in the order processing workflow with a single click. It can speed up your order processing significantly and ensure that certain steps cannot be omitted through human error.
Many users will already be aware of this feature, but some of its functions are less well-known than others.
- If you are unfamiliar with this feature, read the article ‘One Click Order Completion in Sellerdeck Desktop’ and consider how the basic feature can help you.
- Whether or not you are already using ‘One Click’, see the article ‘Advanced One Click Order Completion’, which describes how it can interact with additional hardware and services to give even greater efficiency.
Accelerate Packing Using a Picking List
A picking list provides a consolidated list of all the items required to fulfil a batch of orders, reducing the number of visits needed to your warehouse or storage area. (This is different from a packing list specific to a single order).
To print a picking list for a batch of orders in Desktop, simply select a block of orders in the Orders list, right-click, and select Picking List. If any orders in the block have been picked already, you will receive a warning message telling you which one(s).

Then bring all the items on the list to the packing area and pack the orders individually. This method also serves as a check that the orders were packed correctly – you should have no items missing and no items left over at the end!
Accelerate Packing Using Barcodes
Packing efficiency can be increased further using barcodes. This requires the product barcodes to be entered in the ‘Barcode/SKU’ field in the ‘General’ tab of the Product Details:

When you pack an order, select the ‘Picking’ tab of the Order dialog. As you pack each product, scan its barcode, and it will automatically be marked as shipped. When you have finished, if you have packed correctly, all order lines will be marked as shipped.
If you pack using this method, disable the option ‘Ship All Lines’ in the ‘One Click Order Completion’ configuration.
Reduce Telephone Enquiries About Orders
To discourage customers from phoning up to ask about their orders, you can enable them to view the progress of orders online. They can do this without having to register for an account. Just go to ‘Online Order Tracking’, which is the bottom tab in Business Settings; enable the three options shown below and upload. (If you use customer accounts, also enable ‘Include Orders from Registered Customers. In this case, the order details will also appear on the account page when the customer is logged in.)

These settings enable a ‘Recent Orders’ link in your website’s header. Clicking this will prompt for an order number and its delivery postcode. Entering these will bring up the current status of the order. If you entered a Tracking Code from the courier in the ‘Progress’ tab of the Order, this will also be shown.

The order status will be updated automatically in the background provided you have this option enabled in the Business Settings ‘Synchronisation’ tab.

Capture Accurate Delivery Information
One of the main causes of failed and wrongful delivery is faulty or misread information – information that was either badly entered by the customer, passed inaccurately by the merchant, or misread by the carrier.
The best way to avoid this is to integrate a data verification service into your checkout, to enable customers to enter their postcode or part of their address and then pick their address from a list. This ensures that their address is correctly entered and correctly formatted.

Sellerdeck’s Real-Time Address Capture widget automatically integrates your checkout with the latest verification service.
Avoid Missed Delivery Dates
Sometimes you need to make a delivery on a specific date; for example, if it’s a gift for a particular occasion, or a customer can only receive deliveries on certain days. Missing a date can be painful for the customer, and painful to put right afterwards.
Sellerdeck Desktop provides tools that can help with this.
An ‘Action Date’ can be set manually in the ‘Journals’ tab of any order. It appears in the ‘Action Due Date’ column of the orders grid. You can sort the orders on this date simply by clicking the column heading, so you can easily see which orders require action today.
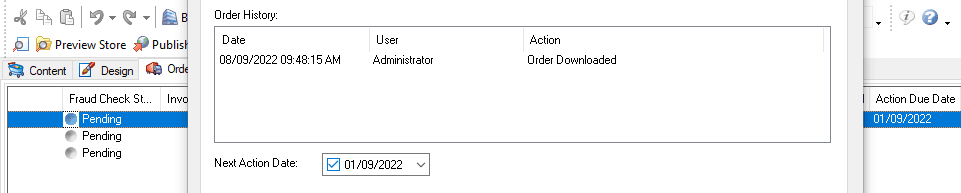
You can include a note in the Journals tab to describe what action is due.
For other tools that can help automate this process, see the article ‘Enabling User-Selectable Shipping Dates’.
One Click Order Completion in Sellerdeck Desktop
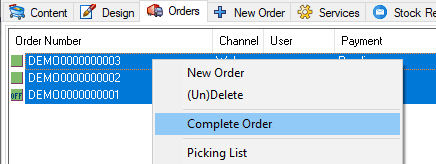
Sellerdeck’s One Click Order Processing feature allows you to carry out a range of actions to complete your orders with a single click of a button – instead of having to print reports individually, mark individual items as shipped, mark each order as paid etc.
When ‘One Click’ is configured, you can select any order or batch of orders in the Orders grid; then right-click and select ‘Complete Order’, or click the ‘Complete’ button beneath the grid. All of the defined actions will be performed automatically for all selected orders:
Configuring ‘One Click’
One Click Order Completion supports a total of eleven different actions, which can be independently enabled or disabled.
To Enable and configure One Click Order Completion, go to ‘Settings > Business Settings > Order Processing’ and tick the box labelled ‘Enable One Click Order Completion’.

Underneath this you can select the operations you want carried out together in a single click.
As a minimum, the following operations are required for Sellerdeck Desktop to mark orders ‘complete’ and move them to the ‘Completed’ tab:
- Create Full Payment. This creates an entry in the ‘Payment History’ for the full value of the order.
You should NOT enable this if you are using a PSP because a full payment entry will automatically be created for each order.
- Ship All Lines. All lines in the ‘Line Items’ tab of the order will be marked as ‘Shipped’.
- Mark Invoice Printed. Marks the Invoice as ‘Printed’ in the order summary list.
If you physically print invoices using Desktop rather than an external application, you must also tick ‘Print Invoice’.
The following actions can also be performed:
- Print Packing List. Prints a packing list for each order.
- Mark Packing List Printed. Mark the Packing List as ‘Printed’ in the order summary list.
- Print Data Entry Report. A ‘Data Entry Report’ will be printed for each selected order. This option is only available if the reports are enabled using the ‘Enable Data Entry Reports’ option under ‘Report Options’ in the same tab of ‘Business Settings’.
- Send Email. Prepares an email to the customer. You can use the ‘Email Template’ field to choose which email is sent. See the ‘Advanced’ article for how to edit the templates.
- Send All Immediately. If ticked, ALL outstanding emails will be sent whenever orders are completed. Otherwise they will be added to the email queue and must be sent manually by selecting ‘Send Emails’ from the ‘Operations’ menu in Desktop.
- Email Template. Select the email template you want to use to generate emails for your customers. Click ‘Browse’ to create/edit templates.
For other options, including those that rely on additional hardware or services, see the article ‘Advanced One Click Order Completion’:
- Use with an external order processing application
- Committing pre-authorised payments
- Order completion by barcode
- Customising the email
Advanced One Click Order Completion
Using With an External Order-Processing Application
If you use an external application such as Sage 50 for order processing, you will only want Sellerdeck Desktop to carry out the internal operations necessary to mark a batch of orders ‘complete’. In this case, enable only the following options under ‘One Click Order Completion’:
- Create Full Payment (provided you are NOT using a PSP).
- Ship All Lines.
- Mark Invoice Printed.

In this case you should pass all ‘Pending’ orders to the external application BEFORE using ‘One Click’ to Complete them.
Committing Pre-Authorised Payments
If you use Sellerdeck Payments (either Payments by NMI or Payments by Opayo) and you have ‘Pre-authorise transactions’ selected in the PSP Configuration, then One Click Order Completion can commit the full payment for each order as part of its processing.
To enable this you just need to tick ‘Commit Payment’ in the ‘One Click’ configuration.

Order Completion by Barcode
Instead of completing orders manually via the order list, you can use ‘One Click Completion’ to complete orders simply by scanning their barcodes.
To do this you must include the order bar code on the invoice or packing list – whichever you intend to use. The setting for this is in the section ‘Bar Codes on Reports’ in the ‘Order Processing’ tab of the Business Settings. Select the report that you intend to use and tick the ‘Order Number’ checkbox.

Next, set the ‘One Click Completion Toolbar’ to ‘Complete’ by clicking thebutton.
Now place the cursor in the order ‘Search’ field and scan the first order barcode, and the order will be completed.
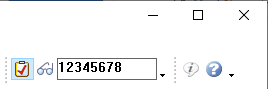
You can also type in the order number manually and click ‘Enter’ to complete the order. Working in this way you can also use wildcards, e.g. ‘*99′ will find orders that end with ’99’ and ‘CD*’ will find orders which start with ‘CD’. If there is more than one match then Sellerdeck will allow you to choose the one you want.
Customising the Email
Most commonly you will want One Click to send notification that the order is being shipped. However you can edit the content of these emails if required. You can also create a completely new email type by using the ‘User Definable’ template or creating a template of your own.

Note: you will need to be able to work around some HTML code in the email templates, but it’s very simple.
To edit an email template or create a new one, open any order in the ‘Orders’ tab, select the ‘Mail’ tab and click ‘New’. (Don’t worry, you won’t actually be sending a new email.)
Next, click ‘Manage Layouts’.
To edit the text in the ‘Order Shipped’ email template:
- Select ‘Order Shipped HTML Inner Layout’ and click ‘Edit’. (If your site is configured to send emails in text format, the template name will be ‘Order Shipped Text Only Inner Layout’ or something similar.)
- Find the main block of text, which normally reads “The following order has been shipped to your delivery address”, and change it to whatever you want.
- If you want to add a paragraph below, first create a new line. Add an opening <p> tag matching the existing ones, then type your second paragraph of text.
- Click ‘OK’, then ‘Done’.
- Finally click ‘Cancel’ – so as not to send an email for the open order – and click ‘OK’.
To create and use a new template of your own:
- Select ‘Order Shipped HTML Inner Layout’ and click ‘Copy’.
- Select the copy and click ‘Rename’. Enter a recognisable new name, eg ‘Order Processing HTML Inner Layout’

- Click ‘OK’, then select the new template by name and click ‘Edit’.
- Replace the text ‘*Enter some text here*’ with the text for the new email.
- If you want to add another paragraph, insert a new line beneath. Add an opening <p> tag matching the existing ones, then type your second paragraph of text.
- To exclude the customer data from the email, delete the whole line containing the variable ‘CustomerData’.
- To exclude the order information, delete the three lines containing the variables ‘OrderData’, ‘OrderLines’ and ‘OrderTotals’.
- Click ‘OK’, then ‘Done’.
- Click ‘Cancel’ – so as not to send an email for the open order – and click ‘OK’.
- Go back to the One Click Order Completion setup and select the new template as the ‘Email Template’.
Enabling User-Selectable Shipping Dates
Generalised Solution
This solution takes the ‘Action Due Date’ feature a step further, using the product ‘Date’ prompt to allow customers to choose a delivery date for the item. The software will then calculate and enter an Action Due Date for the order, for the date on which the product should be shipped. The calculation is based on criteria you can define yourself.
To enable and configure this feature, go to ‘Settings > Action Due Date’ and tick ‘Set Order Next Action Date … ’. Then configure as follows:
- For ‘Adjust Date By’, enter the number of delivery days for your carrier. Eg if delivery is 48 hours then enter ‘2’.
- The feature can handle shipping of multiple items on different dates. To support this, tick ‘Reset Date to Next Earliest’ and tick ‘When Product Shipped’. After the product with the earliest date is shipped, a new Action Date will be set for the next product in the order.
- If you tick ‘Update Order Action Date When Editing Product Date Info’, then if you manually change the date set by the customer, the Action Date will be reset accordingly.
- To avoid an Action Date falling on a day when you are not working, tick ‘Take Action When Date is Non Working Day’. Tick ‘Adjust to Previous Working Day’ to shift the date automatically, or ‘Prompt’ to just receive a warning. You can flag Saturdays and/or Sundays as non-working, and also Add other non-working days such as Bank Holidays.
Next, enter a Date prompt in the Product Details ‘Prompts’ tab for each product that you want to offer this feature:

When you are happy with the configuration, upload to make the new feature live.
Fully Flexible Solution for DPD
DPD users can install the Sellerdeck DPD Shipping Integration, which enables shoppers to select any DPD service that you offer and pick a delivery date appropriate to that service. If you also support ‘Ship to Shop’, they can select a pickup point near to them just by clicking a pin on a map in the checkout. All of their selections are recorded with the order.
See the ‘Extensions Catalogue’ tab in Sellerdeck Desktop for details, or visit the Extensions Catalogue online.
Note this extension does not automatically send order information to DPD.