Stock control for simple products is very easy to set up in Sellerdeck Desktop. It’s merely a matter of enabling stock control in the Business Settings, then enabling it and entering a stock quantity for each product.
Provided you enable ‘Automatically Download Orders, Update Stock Levels … etc,’ in the ‘Stock’ tab of Business Settings, stock levels will be automatically kept in sync between the desktop and the website. The sync event is fast and runs in the background. Generally, setting the ‘Wait Between…’ frequency for this action to a minute or so will give a good performance. You can even set it to be more frequent if you have a fast server.
While these settings work well for basic stock control of simple products, there are many situations where more refinement is needed. This article covers the following:
- Handling Stock for Complex Products
- Preventing Selection of Out-of-Stock Options
- Reserving and Anticipating Stock
- Faster Stock Updates
- How to Manage Stock of Products in Bundles
- How to Manage Stock of Products With Variants
Handling Stock for Complex Products
Products With Variants
Where there are different variants of a single product – for example, different sizes and colours – it’s no good just entering an overall stock quantity for the basic product. You need to manage the stock of each variant or SKU (Stock Keeping Unit).
Fortunately, Desktop provides several options for doing this. For reasons related to the data architecture, all of them require that the Attributes of the product are attached to a Component.
For more information, please see the section below, ‘How to Manage Stock of Products With Variants’.
Product Bundles
You may have products you sell separately and as part of a bundle, where you need to keep track of the stock level regardless of how they are sold.
The ‘Assembly Product’ product setting is designed specifically for this configuration. To find out how it works, see the article ‘Stock Management of Product Bundles’.
Preventing Selection of Out-of-Stock Options
By default, if a customer selects an out-of-stock combination and tries to add it to the cart, a message will be displayed informing them that it’s out of stock.
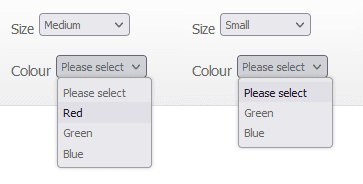
Often, it’s better if out-of-stock combinations are hidden dynamically as the customer makes their choices. For example, if small red T-shirts are out of stock, then if a customer selects size ‘Small’, it’s better if the colour ‘Red’ is not even offered as an option:
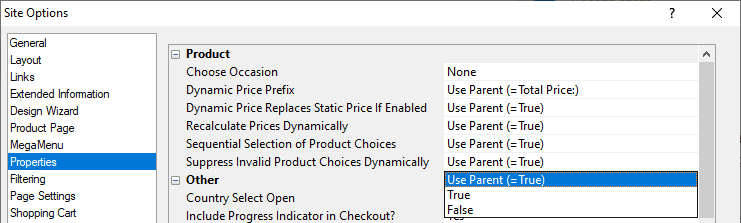
Achieving this is simple. First, make sure that ‘Suppress Invalid Product Choices Dynamically’ is set to ‘True’ in Settings > Site Options > Properties.
Then select the Product Component in the Content Tree, and select the ‘Layout’ tab in the Component Details. Tick ‘Hide Out of Stock Options’, click ‘Apply’ and upload. That’s all there is to it.
If you want all new products that you add to the catalogue to be set up like this automatically, simply tick ‘Hide Product Options That Are Out Of Stock’ in the ‘Options’ tab of the Business Settings.
Reserving and Anticipating Stock
Reserving Stock
If you need to reserve a certain amount of stock for other channels, such as eBay or a real-world shop, but you still want to record total actual stock levels in Sellerdeck Desktop, you can do this quite easily. Just select the ‘Stock’ tab of the Product Details, and set ‘Suspend Orders If Below’ to the stock quantity that you want to reserve. The website will stop accepting orders for the item when stock falls below this level.

This setting works for stock control at both the Product and Permutation level. The only limitation is that you cannot set different values for different Permutations.
NB If ‘Suspend Orders If Below’ for a product is set to zero, then the actual value used will be the default value set in Business Settings > Options > Stock Control
You can use the same method to limit online sales to prevent over-ordering of fast-moving products.
If you offer a payment method where approval of payment may take a little time – for example, v12 Finance or PayPal Credit – you may need to reserve stock for those orders whilst waiting for approval. In this case, tick ‘Allocate Stock for PSP Pending Orders’ in the ‘Options’ tab of Business Settings:

Anticipating Stock
If you want to anticipate stock delivery and allow over-ordering of a product, you can set ‘Suspend Orders If Below’ to a negative value. For example, setting it to -50 will allow 50 more items to be ordered than you currently have in stock.
Faster Stock Updates
If you’re doing a stock check or adding stock from a new order, it can be a nuisance to update the stock levels via the Content Tree. Dynamic linking to an external database is incompatible with stock synchronisation, but fortunately, another method exists.
Select ‘Stock Levels’ from the ‘Operations’ menu, and a stock table will be displayed in a new dialog.
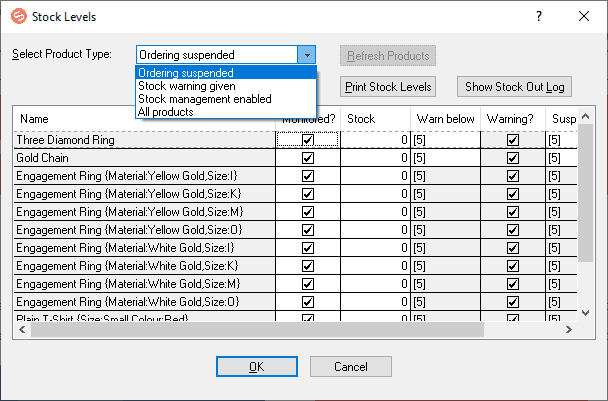
In this table, you can enter the new stock level for any product directly in the ‘Stock’ column.
Both the dialog itself and the table column widths are resizeable using drag and drop. You can sort by any column in ascending or descending order by clicking once or twice on the column heading.
Unfortunately, you can’t browse or search by Product Reference or SKU. But you can filter the results using the ‘Select Product Type’ dropdown. You can display all products; all products that are under stock control, products whose stock is below the ‘Suspend If Below’ value; and product whose stock is below the ‘Warn If Below’ value.
Stock Reports and Stock Checking
To help you monitor stock levels and timely order of new stock, you can also filter product reports by the same product types. These can either be printed or saved as a PDF.
Select ‘Report Selection’ from the ‘Operations’ menu and click the ‘Catalog’ tab.
How to Manage Stock of Products in Bundles
The ‘Assembly Product’ setting (in the ‘General’ tab of the Product Details) enables you to keep track of the stock of individual products that are sold as part of a bundle.
To set up a product in this way, take the following steps:
- First, create a new product for the bundle. You will probably want to sell this for a fixed price, so enter the Price for the bundle and set the Pricing Model to ‘Product Price’. (If you want the price to equal the sum of all the component product prices, set the Pricing Model to ‘Sum of Component Prices’.
- To display the stock level or stock status of the bundle, tick ‘Stock Control / Monitoring’ in the Stock tab. The stock level can be left at zero – it will be ignored. (Due to a technical limitation, the stock display in the local preview will show ‘Out of Stock’; but the display on the website will be correct.)
- Check that each product included in the bundle has stock control enabled and a stock quantity recorded.
- Add a Component for each product in the bundle, and link each Component to the relevant product in your catalogue. To do that, start typing the product name in the ‘Associated Product’ box in the ‘General’ tab of the Component Details:

- If the bundle contains more than one of any product, set the ‘Quantity Used’ for the associated Component to the quantity in the bundle.
- Repeat these steps for all the products in the bundle.
- Finally, select the ‘General’ tab of the bundle product and tick ‘Assembly Product’.
Now, whenever a bundle is sold, the stock level of each product will be decremented by the number in the bundle. The stock level shown online for the bundle will be based on the product with the least available stock.
How to Manage Stock of Products With Variants
- The easiest way to set up a product with variants is to add them using the Product Options Wizard (Product Details > Product Options). This enables you to add any option, e.g. size, along with its choices, e.g. red and blue, and then combine it with as many other options as you like – e.g. colour or style.
- If you have already set up the Attributes without using a Component, there is an easy way to change it. Set up a dummy product, drag and drop the Attributes to it, add a Component to the original product, and drag the Attributes back. (You cannot simply add a Component to a product that already has Attributes.)
- Select the Component in the Content Tree and then the Permutations tab. If you used the Wizard, then the Permutations table will already be populated. If not, just click the ‘Fill List’ button at the bottom left of the table.
- For each valid combination in the table, tick ‘Stock Controlled’ and enter the current stock level. If any combination is invalid – e.g. if size S is not available in the colour Red – just untick ‘Valid’ for that combination, and it won’t be offered:
If you are using hidden products for any or all of the product variants, the hidden product name will appear in the ‘Product’ column. In such cases, enable Stock Control Monitoring in the Stock tab of each hidden product and enter the stock quantity there.
Important: when handling stock at the Permutation level, with or without hidden products, you must disable stock control for the parent product by unticking ‘Stock Control / Monitoring’ in the Stock tab of the Product Details.
If you need to change the options on a product after you have created them, refer to the article ‘How can I edit options once they have been created?’ in the main software help (Help > Help Topics).