In the early days of ecommerce, website owners could capture and download credit card details and process payments offline. One payment method was generally enough – by accepting orders online you were already ahead of the competition.
Since those days, things have moved on dramatically. Online fraud has become sophisticated and widespread and security has tightened up dramatically. Competition has increased and customer expectations have risen. To attract online orders today you need to offer better security, greater reassurance and more choice.
This article summarises some of the must-have requirements for clinching the final step in securing online orders – taking the payment.
- You must use TLS security (https) for your checkout pages at least. If your whole site still uses http, then you must change this to comply with current regulations. See How do I implement TLS security on my website?
- Different customers prefer different payment methods, so provide multiple options. You can add as many methods as you like in the ‘Payment Methods’ grid in the ‘Payment and Security’ tab of the Sellerdeck Desktop ‘Business Settings’ – though too many can be confusing. As a minimum, you should support:
- Payment by debit or credit card. Use a third-party payment gateway such as Sellerdeck Payments. The gateway will handle PCI-DSS compliance so that you don’t have to.
- Payment by PayPal. PayPal is widely used and makes the checkout process faster and more convenient; only the customer’s user name and password need be entered.
You may also want to offer:
- Amazon Pay – another account-based checkout alternative.
- Other methods where appropriate, such as bank transfer or cheque in advance.
- Since 1st January 2021, Secure Customer Authentication (SCA) has been required for all online payments. The preferred method for implementing this is 3D Secure, and this is the method supported by Sellerdeck Desktop. Depending on your payment provider, it is enabled either in your payment account online, or in the payment provider configuration in Sellerdeck Desktop. (Business Settings > Payment and Security, select Payment Method and click ‘Configure Method’)
- If your products are particularly susceptible to fraud, you can improve the security for card payment with some other options. These will depend on your provider and may include:
- Enforcing validation of the CVV2 number
- Enforcing validation of the delivery postcode
- Enforcing validation of the whole delivery address
- Some may be selectable via in the payment provider configuration in Sellerdeck Desktop (Business Settings > Payment and Security, select Payment Method and click ‘Configure Method’). Others may be offered via your payment provider account.
If are concerned about potential misuse, you can limit a payment method to specific locations – for example, to restrict card payments to specific countries. See How do I limit a payment method to specific localities?
Unless your goods are delivered digitally at the point of sale, you should use pre-authorisation for card payments and only commit the payment when you ship the goods. This is good practice, it simplifies the handling of order cancellations and changes, and it is more reassuring to the customer.
- Depending how many payment methods you offer, radio buttons can be quicker and easier than a drop-down list for customers to see and choose their preferred method.
See How do I present my payment methods using radio buttons? - Provide reassurance up front by showing icons in your site pages for the payment methods you accept. Appropriate images are normally available from the respective providers’ websites, and can be incorporated into your site design.
How do I implement TLS security on my website?
TLS security (or https) requires that you have a secure certificate implemented on your website. Contact your hosting provider to put this in place first.
Once this is done, select the ‘Payment and Security’ tab in Business Settings and tick ‘Use SSL/TLS’. There are two options.
- Checkout, Login and Account Details Pages only. This is the simplest and safest to implement and provides the minimum level of security necessary.
- Whole Site. This secures all the pages of your website and shows the ‘golden padlock’ in the browser for all of them. However it requires code to be added to your server to redirect search engines and existing hyperlinks from the old http:// addresses to the new https:// addresses. This can be implemented by your hosting provider.

Once you have made the changes, upload your site. The server-side redirects should be implemented as soon as possible afterwards.
How do I limit a payment method to specific localities?
To restrict any payment method to orders for specific locations:
- Go to Business Settings > Payment and Security
- Select the method in the Payment Methods grid
- Tick ‘Limited by Location’ and click ‘Configure Valid Locations’
For each ‘Available Location’ where you want to allow the payment method, select the location and click the left arrow button to add it to the list.
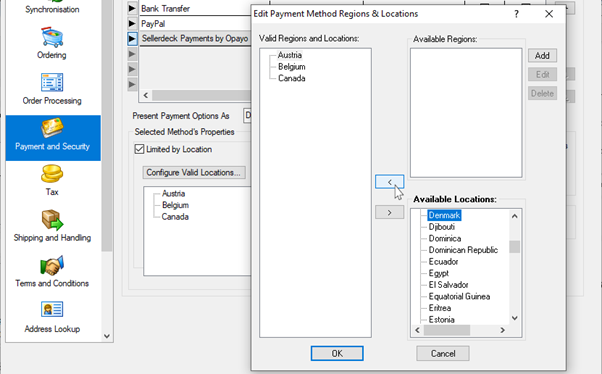
- Click ‘OK’, and ‘OK’ again
- Upload the site to implement the selected restriction.
How do I present my payment methods using radio buttons?
Switching to this presentation is very simple. Just change the setting ‘Present Payment Options As’ from ‘Drop-Down List’ to ‘Radio Buttons’.
