In today’s competitive market, you need to be able to sell your products with ease and without any obstacles. One of the best ways to do that is by making sure that they look as good as possible. If you have WooCommerce products on your site, there are a few things you should know about how to size them for maximum quality. Read this post for all of the information!
There are three important factors to consider when adding product images to your WooCommerce store:
- Product Image Dimension (Width and Height)
- Product Image File Format
- Product Image File Size (Smaller file size for faster page loading)
Each of them should be taken into consideration in order to optimize the quality and size of your product images.
Product Image Dimensions for WooCommerce
First, you need to know how big the image is supposed to be before uploading it onto WooCommerce. This will ensure that each one has a uniform appearance when displayed on different screen sizes.

What dimension should my product image be for WooCommerce?
For WooCommerce your product image dimension should be 800x800px
There are two ways you can go about this and you don’t require a WooCommerce developer.
- By using a photo editing software like Photoshop to resize the image
- If you are an adobe novice you can use an easy to use and free tool like Canva
You can create a product image template on either tool which will ensure that each one has a uniform appearance when displayed on different screen sizes.
How to create a product image template on Canva
Firstly you will need to login or alternatively you’ll need to set up a Canva account
Find out how to set up a Canva account here.
Create a custom Canva template
Once you have logged in, select the ‘custom size’ button in the top right-hand corner. Then input your height and width dimensions, for our product images that would be 800x800px.

Upload your images to your template
Navigate to ‘Uploads’ on the left-hand panel, then select upload media. Then upload your image from your desktop device.

Add your image to your board and size
Drag your image to the board and then drag the corners to meet the width and height of the template.

Export your image
Once you have sized your image, you can then export it. To do this navigate to the download button and change the file type from PNG to JPEG. Then click download to export to your desktop device.

How to create a product image template on Photoshop
Open Photoshop on your desktop
- Then create a new document
You can do this by navigating to the ‘create new’ button on the left-hand side. Once you have selected ‘create new’, a new window will appear, you can then adjust the dimensions of your document to 800x800px. To do this go to the preset details on the right.
Adjust your photoshop document to the following for best quality images:
Width: 800 Pixels
Height: 800
Resolution: 72 Pixels/Inches
Background Contents: Transparent

Save the template
It is important to save a master copy of the template, so you can reuse it for other product images and this way you do not have to go through the hassle of recreating it for every product image. We advise you create a digital asset management system (DAMs), which can be a simple folder that holds all of your assets i.e. product images, hero images, graphics and adobe templates.

Add your image
To add your image, navigate to ‘file’ in the top left-hand corner and the select place embedded. The file explorer will appear, navigate to the image file location and double click on your image. This will add the image to your artboard.
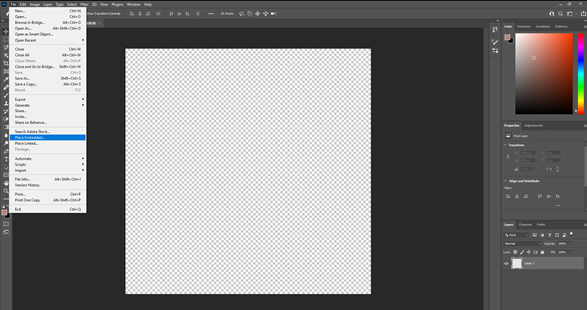
Then you will need to size the image to the board’s specifications. You can adjust the size of the image by dragging the corners. Once you are happy with the sizing, press enter on your keyboard to embed the image.

Export your product image
In this section we will show you how to export images on photoshop for web, so that image is compressed and optimised for you faster loading times.

Navigate to ‘file’ and then select ‘export’, then select ‘save for web’.
Once you have opened ‘save for web’ you can start to adjust presets. For this particular image we used the following adobe photoshop presets:

JPEG
High
Quality 60
Optimized
The presets will differentiate for different product images as some raw images will be heavier than others, you will be required to amend and adjust accordingly. As you adjust the presets you can check what size the image will be exported at in the bottom left-hand corner.
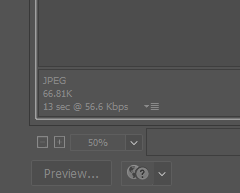
Once you are happy with the image file size and quality, you can press save, this will save your image to the folder of your choosing.
Product Image File Format for WooCommerce
Second, you need to consider what format the image will be in before uploading it onto WooCommerce. Some formats like JPEG or Webp will work better for smaller images, while others like PNG or Webp will be best suited for transparent photos. Avoid using PNG’s where you can, as these are heavier file types and will slow your website down.
For product images, we advise using JPEG or Webp.
Product Image File Size for WooCommerce
Lastly, you need to know what quality level you want for each product. If possible, always go with images that are as large and of high quality as they can be without compromising speed. This is because you can compress the image and if done correctly you can retain the image quality.
Why is image file size so important?
The file size determines how long it takes to load the product in a browser. When a customer is viewing your WooCommerce store, they will have to wait for the image to load before looking at the product in detail and making decisions about purchasing it. Large file sizes should be avoided because of how long they take to download over slower internet connections.
What is the optimum file size for my product images?
The optimum file size is dependent on the WooCommerce product type. For apparel, furniture, and similar items you’ll want to use a file size that will not compromise the detail of your products images. On average for speed and quality, we recommend 75kb. This ensures it loads quickly but will still look good.
What tools can I use to compress my product images?
Images should be compressed using a graphics program like Adobe Photoshop or an online compressor like TingPNG before uploading to WooCommerce, as this will optimise your images by reducing file size.
WooCommerce Products Images Key Takeaways
- WooCommerce product images should be 800x800px
- WooCommerce product images should be in JPEG or Webp
- WooCommerce product images should not exceed 75kb
- Create a template on Photoshop or Canva for consistency and efficiency